Because several Users asking via PN about my "Tools" for OBD2 Experiments, here some pics 
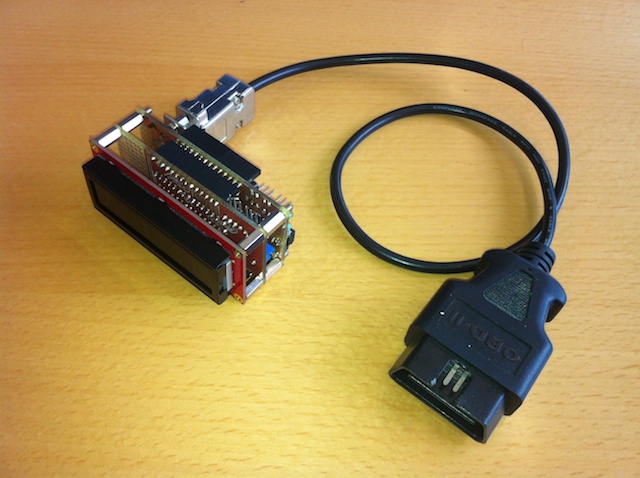
Basically it's an Arduino, but radically changed form factor. Reference was the part I will see in my Vette, the Display. They have a standard size, 80x36mm. Everything is behind this Display, so no problem to mount it in a frame. Next step will be designing a nice case for it, probably with a GoPro Mount to use their mounting pads. I will publish the Files for printing on a Reprap, or other 3D printer.
The 2nd PCB is a ATMega328, for low power consumption running at 8MHZ with Arduino Bootloader. All Pins are available by stackable Pin Headers, the Display can be directly plugged on top. LCD or OLED, both can be driven. It is possible to switch off the whole Display, and control the Brightness by PWM Output. Contrast by Poti. (For LCD, with OLED the Backlight Pin will be available for other use)
The last PCB is probably the most interesting one, it's the OBD2 Interface. Thomas V did a very very nice job, I won't ever touch an ELM322 again.
Most important: If it's powered on, it immediately starts spitting out all bus traffic in formatted data mode to the arduino. Or you plug in a standard FTDI Programing Cable, and get all traffic in your notebook. 
It sends ALL traffic, not just "most of it" like an ELM. That's why it runs with 57kBaud. Class2 works at 10.4kBaud, but for every byte on the bus, the interface needs to send 3 bytes to your PC/Arduino. A single byte like 0x3F comes out as "3F ", for easier reading. It's same like an ELM322 with ATFD and ATH1 switched on, and then ATMA.
Looks like this:
Code:
A9 28 A0 01 BA
C9 CE A6 3C 8F
88 CE A0 82 01 AC
A8 CF A6 90 7E
CB EB 60 20 9E C0
Next nice advantage: Whatever you send to the interface, appears on the bus. No limit in message length, you can really send whatever you like. Even long commands for controlling the fans or special block mode requests.
Another feature: The Class2 TX circuit needs a lot of power. In this Stack, you can switch it off, it uses the same pin like the display power. Receiving Class2 commands is still possible, with a very low power consumption (around 7mA). So it can stay in your car without draining the battery. Just write a sketch what turns off the display/TX-Circuit, kind of sleep mode. With the 1st bus message, it wakes up again.
What we did already on this prototypes:
- Class2 controlled Dual Mode Exhaust Control
- Audi TT style rear wing control, based on speed and acceleration
- a Window Controller: 3x FOB Unlock, and the windows open. 3x Lock, and they close. 1x Close and 2x open withing 2 seconds: Fuel Tank lid pops open. Very nice in a Corvette, where you have to sneak in again, in the case you forgot to open it in a gas station ")
I guess there are 1000s of othe useful things to do with it, that's why we made it very modular. Just use the interface with your PC, or Interface and Arduino if you don't need a Display.
Or just use Display and Arduino to show Values from analog in, or I2C. As an example, this could be useful for a nice AFR Meter, if your wideband just provides 0-5V.
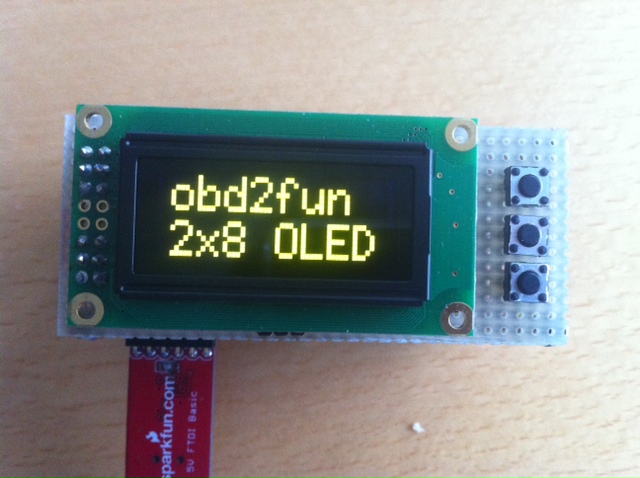
Currently I'm playing with a new shield, it's a 2x8 OLED Display plus 3 Buttons. Nice for a menue, or to toggle different screens:
We're thinking about producing a little series of PCBs, this ones in the 1st pic is one of three prototypes, made on a CNC controlled mill. Quite expensive way of producing PCBs 
Plans for the Winter:
- Corvette C6 IPC / HUD in a C5
- PaddleShift for C5 A4
- Door Unlock with iPhone by Bluetooth App (Thomas is currently working on a BT-Shield for our Stack)
Happy Vetting from Switzerland,
Michael 

Originally Posted by WDZaphod


 Reply With Quote